Tuesday, 31 July 2012

Striping tape? No striping tape?...you be the judge!

Second post for the day. 
I did this design last night. It was one of those ones that you don’t know what you are going to do  so you just start making dots!  I actually had a lot of fun with it.  I used Nicole’s ‘Baby Blue’ for the base. It’s weird because originally I didn’t like this polish but I keep going back to it.  I’m really attracted to light blues recently. I’m trying to do nails in other colours than blue but I can’t help it. 
I started by making dots across the corner of my nail with Quo’s Steel Heart leaving spaces in between. I then went back and filled them in with more dots in the original  Baby Blue that I used for the full nail. 
I took pictures as usual but decided it needed a little more. I added black striping tape along the edge of the design.  What do you guys think? Striping tape or no striping tape?


WITH STRIPING TAPE


WITHOUT STRIPING TAPE

Revlon 'Whimsical' and 'Scandalous'

I figured I’d make this the first of two post today. Chances of me posting tomorrow are slim to none seeing were moving.

Last night I did two swatches of Revlon Nail polish in ‘Whimsical’ and ‘Scandalous’.  So long story to these nail polishes.  Before attempting my first jelly sandwich manicure I was searching the web looking at them.  Whimsical seemed to come up a lot.  All of the sudden I needed it! It’s funny because I can recall seeing it at Shoppers Drug Mart and every other place I went with polish.  I thought to myself who would by this(this is pre nail obsession)  Well once I saw the jelly sandwiches I needed it! Of course when I went to buy it it was nowhere to be found. I went to a couple different Shoppers Drug Mart, drugstores and even Walmart. I don’t like to buy things from Walmart so that’s proof enough how much I wanted it.  

Well finally I found it at well.ca I put it in the shopping cart but waited while I surfed the rest of the site.  When I went to checkout they said it was no longer available :o( Finally a week later they had it back and I ordered it along with Revlon ‘Scandalous’.  I was sooooo happy.
 got it in yesterday!  I had to try it right away(at work).  Three coats on of ‘Whimsical’ and it was looking pretty crappy. I figured I’d need a coat of colour first anyway.  So when I got home I put on a base of Nicole’s ‘Baby’.  I also had to put on a top coat because Whimsical did not have a very nice finish.  I’m still happy with it though.  What do you guys think? Was it worth the hassle?

Sorry the picture is a little blurry

For Revlon 'Scandalous' I used a purple base.  Don't ask me which one because I forget ;oP


Monday, 30 July 2012

Essie's Mojito Madness

Mojito anyone?

I picked this colour up and knew exactly what I wanted to do with it.  The name inspired me of course.  This is another first attempt for me.  I decided to make half limes at the tips of my nails. I’ve seen a lot of fruit nails and really wanted to try it myself.  I used two coats of Essie’s ‘Mojito Madness’ for the base of my nails. I found the nail polish to be a bit thick.  I don’t think it was a manufacturing problem.  The cap had some polish on it when I bought it and a bit of dried polish around where the lid screwed it on.  It was the last bottle so I took it anyways. 
For the limes I made a semi circle with Sally Hansen’s Xtreme Wear ‘White On’.  This is by far my favourite white.  It’s the perfect consistency for me. I don’t have to add a million coats for it to become opaque.  I made the outside skin of the lime with Revlon’s ‘Posh’.  This was extremely difficult for me.  I used the dotter to make the line. I really need to invest in a good set of nail art brushes.  For the inside wedges of the lime I used Mojito Madness again and for the little seeds I used Sally Hansen’s Mellow Yellow.  I added a top coat to smooth out the finished product.  I’m new to the nail art aspect so I find my designs get a little clumpy. 


Other than the problem with the consistency of my polish was that it stained my nails.  Were talking big time stain. I realize that it is because I didn't use a base coat but even so I don't think a polish should stain as severely as it did :(

Sunday, 29 July 2012

CandyLand Nails-Homework assignment....failed :(

For the second week now Nicole at Nearly Nailed and I have decided to do a Sunday night homework challenge.  Before I go any further on this weeks challenge I just want to suggest that you all go check out her blog.  It's a great blog to follow and shes a really funny sweet girl.  She's been helping me out with Twitter but I'm still iffy about it. (she seems to be a pro) Blogger is still giving me enough challenges to handle

Anywhooo..... last week we both attempted our first jelly sandwich manicure.  This week Nicole decided what the homework assignment would be. She decided on a manicure inspired by our favourite board game.  That was hard for me because I hate board games. I just can't stand sitting and playing something that I know I have to finish. lol I thought back to the one game I use to love when I was little....Candy Land! I never owned it myself but my friend did and we always use to play.  Of course I grew up with the 80's Candy land.  Alot has changed since then.
 I decided to assign each nail to a different location on the game board. I had an idea in my mind before attempting this and it looked AMAZING!....then I attempted it :o(
I did not keep track of the nail polish I used as I was all over the place.  Take a look below to see what locations inspired what nails!


Although you can't see very well in the photo I had purple glitter on the plums.  It was VERY sparkly :)


Peppermint Forest was probably the easiest

I had added glitter to the microbeads to give it that extra sugar look. Unfortunately you can't see it.....again :(


I was not happy with this one at all.  I was going to try something else but was on a time limit.  (I'm still packing for the move)


For Molasses Swamp I actually had to mix polishes together to get brown. I need to get a brown polish.  I used a Konad stamp to get the swirly effect


So all in all I'm not going to lie.  I was not happy with this at all. The only reason I'm posting this one is for Nicole.  :oP  Next week is my choice of homework assignment. hmmmmmm ;)


Saturday, 28 July 2012

Braided Nails

I'm not going to lie this is not the first time I've attempted a braid manicure.....but it is the second so take it easy on me ;o) 
I actually hope to do a little more tutorials like I did with my caviar nails.  Right now it is not possible though as I'm in the midst of packing and moving.  As soon as we get settled in to our new place I will be sure to do some.  I always love seeing how things are done myself so that's why I plan on doing it.
For this manicure I started off with two coats of Finger Paints 'Inkblot Blue'. I decided to just do the braid on my ring finger because it was a little frustrating for me :oP. In the braid I used the 'Inkblot Blue, Quo's 'Steel Heart' and Rimmel's 'Black Satin'. 
The concept is pretty easy because all of us girls have made a braid at some point in our life.  The difficulty for me was keeping the lines straight. Something else I will have to work on is keeping it centre. It slowly went to one side.

What do you guys think? Any suggestions to make this go a little more smoothly for me?

Nfu Oh 61

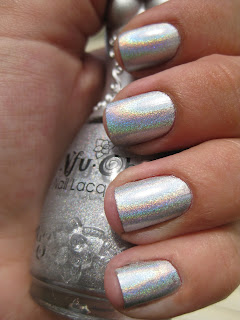
I couldnt' help it! I had to swatch this polish. I saw it awhile ago on the Internet during my travels and just had to buy a bottle. I'd never heard of Nfu Oh(remember I'm new) and these amazing holographic polishs.  I'm still in aww every time I see them.
I purchased this bottle of course from nailpolishcanada.com. When I got it I thought they had sent me the wrong bottle because it looks just silver and blah. Even when I took it in the sunlight it still looked very disappointing.
Well then I tried it on my nails.  T'was love at first sight. I can't believe the effect it makes.  It looks as though it should be a strip or sticker but it's not!  I should of taken pictures when I first tried it on. It was very sunny and I got the full effect.  It's clouded over....again so these pictures do not do it justice....at all. 


In the below picture you can see what it looks like in the shade.  My pinky finger does not look all that impressive.  Of course it still does have some effect just not pictured here.


It is also the most beautiful nail polish bottle I have ever seen.  So unique!


Friday, 27 July 2012

Dotticure!

I really love this manicure.  The pictures don’t do it justice.  It was rainy and clouded over yesterday so these were the best pictures I could get. (I really need to make that light box)
 I was so excited to play with my new dotters I got in from Nail Polish Canada.  Now I have ten different sizes of dotters!!! It was like Christmas morning! 

I started off with two coats of Orly’s ‘Decades of Dysfunction’.  I’m really liking this polish as a blank canvas when doing nail art.  It’s very subtle and work appropriate.  For the dots I worked my way down from largest to smallest making sure not pass the middle of my finger nails both at tip and cuticle.  As I applied I tried to keep it in a half moon shape. 

What do you guys think? I know I’m pretty proud of myself :o)


Nail Polish used for dots.

Revlon provence
Nicole 'Fanatical Fuchsia'
Essie 'Bahama Mama'
Urban Outfitter's 'Bandeau'


Thursday, 26 July 2012

Just playing around......manicure :P

Today’s post is something I did on the weekend. I was just playing around and came up with it.  Although not my favourite I really liked the look and will definitely try something like it again.
It was very simple. For the full nail I applied three coats of Revlon nail polish in ‘Provence’.  I find it very sheer so that’s what I required three coats.  With my dotting tool I created the lines alternating between Essie’s ‘Bahama Mama’ and Nicole’s ‘Baby Blue’.   I made sure to overlap each new line just a little over the previous to give it that cloud effect.  I’m saying cloud because that’s the only word I could come up with. There must be a name for this look. Anybody know? Maybe ruffles???


Wednesday, 25 July 2012

Striping Tape!!!

I just wanted to write a quick post before I head off to bed :o)  I received my order in today from Nail Polish Canada.  What did I get?  Well I decided to get some striping tape(and maybe a little more).  I've seen it on some blogs and really liked the looks created with it. 
Below is my first attempt.  My mind has been all over the place with our upcoming move so I was lacking in ideas. I can ensure you I will make up for it!

I used two coats of Quo's 'Filthy Rich'.  The striping tape is incredibly easy to use.  I just laid it on the nail and trimmed off any excess. 

I took this picture inside with my camera minus a flash :oP  The polish had a much better glimmer in person. Once I get settled in to my new place I will attempt making a light box.....key word.....attempt


NIGHT NIGHT, DON'T LET THE BED BUGS BITE!!!

Flowers and Microbeads....awwwww...

I had a little fun last night!  I slapped on a couple coats of Quo’s ‘The Blue Box’…..then I proceeded to look at my nails for 20 minutes or so.  :os  This is what popped into my head.   I had fun with this one. I was contemplating doing all my nails but figured it would be too much. 

I made the flowers with Sally Hansen’s Xtreme Wear in ‘The Real Teal’. I then added a top coat to all nails and let it dry.  To add the micro beads I just put a drop of top coat in the middle of the flower and sprinkled them on. Fun stuff! You like????


Grape Jelly Sandwich manicure

I couldn't help it......I love jelly! 
Yesterday during my lunch hour I happened to run into some nail polish. No surprise there right?!  Considering I got it at Urban Outfitters and that's the only reason I go there I guess its not quite a coincidence.  I saw this beautiful purple that made me think of grape jelly right away.  The consistency looked perfect for a sandwich.  It turned out it wasn't but I made do.  The pictures don't do the colour justice.  Its beau-ti-ful!

I applied two coats for the base followed by one coat of the sparkle.  For the top I had to use a very thin coat.  It's not very jelly at all so I applied one coat of Essie's 'Good to Go' top coat.


Both of course are Urban outfitters nail polish. (2 for $8) The sparkle polish is called 'Dust' and the bright purple is 'Bandeau'


Tuesday, 24 July 2012

Reduce, Reuse, Recycle...Sally Hansen Salon Effects

Reduce, Reuse, Recycle.  The three 'R's we all learned about in public school.  I can do the reuse and recycle but the reduce????....I don't think so.

For this manicure I started of with 2 coats of  Rimmel's Lasting finish pro in Stilleto Red.  I love the shape of the brush and the polish goes on so smoothly.  I originally bought this for a bachelorette party last year and am now on my second bottle. I love the shine it keeps. 
For the strips I cut up an old dried out Sally Hansen Salon Effects nail strip in 'Blue Ice'

For once my camera was able to capture the sheen on a nail polish. Unfortuantely it didn't capture the sparkle of the strips.  They were glittering like a Christmas tree :o)

Monday, 23 July 2012

Mellow Monday

Nothing too fancy today.  Just wanted to go with something subtle with an itty bitty bit of colour.
I started with two coats of Orly's 'Decades of Dysfunction'. (Which by the way is my first Orly polish ever!)
The dots I made with Sally Hansen's Xtreme Wear in 'The Real Teal'

Short post eh?! 
I feel really guilty that its so short so I decided to throw in my swatches I did with Gosh's Matte Top Coat.  I found this last week at Shopper's Drug Mart and just had to buy it.  I wasn't sure if I would ever use it again but now I know I will!!!


BEFORE


AFTER


The index and middle finger only took one coat but  the ring and pinkie took 3.  I guess it just depends on the type of polish it is put over. 
What do you guys think? I'll probably try doing something a little fun with it soon!

Sunday, 22 July 2012

Jelly Sandwich Manicure

Mine and Nicole Gets Nailed( http://nearlynailed.blogspot.ca/) homework assignment this weekend was to attempt our first Jelly Sandwich Manicure.  I came across the manicure on tons of other blogs and just loved the look.  So again I decided to post my first attempt at one. 


I started out with two coats of Essie's 'Lapiz of Luxury'


For my glitter I added a coat of American Apparel's 'Galaxy'. 


Then I topped it off with one more coat of Essie's 'Lapiz of Luxury'. Ta-Daaaa. I was pretty happy with it.  I'd like to try something in purple next time.


I tried one more out with Revlon's 'Royal'.  I really like the way this one turned out


Saturday, 21 July 2012

Hello Kitty French manicure

I originally created this Hello Kitty inspired french manicure for my sister-in-law. I promised myself to wait to post it until she finally got around to following my blog. Well it hasn't happened yet but she promised she would take a look today.  So as a welcome I thought I would post this for her.

I tried adding a top coat but it just ended up looking like Hello Kitty's mascara was running.

I probably wouldn't wear this out as I'm not a big fan but my sister-in-law is. Sooooo this is for you Dawn!!!!xoxoxox


What do you guys think?!

Friday, 20 July 2012

Friday Night Crazies

So instead of going crazy at a pub tonight I figured that I would go crazy on my nails......VOILA!

 I used Sally Hansen Xtreme Wear in 'Sun Kissed' and 'Pacific Blue'.  The strips are old Sally Hansen Salon Effects in 'Check, Please!' I had one or two of these strips left over from an old manicure. They had dried and become pretty useless.  I've kept all my left overs for these purposes though.  All I do is add a bit of top coat and stick the strip on top.  Easy Peasy and very cheesy!!!

Mint Chocolate Chip Mani

I wasn't going to post this because I feel it's kind of sloppy and the picture is not that great. I figured what they hey though. I'm bored at work so why not. The reason for the name is because it reminds me of those mints you get a restaurants with the chocolate in the middle and always a green wrapper.


For this look I used I used Essie's 'Show me the ring for the base'.  I used two coats as it was kind of streaky. For the green dots I used Revlon's 'Posh'.  As far as the brown I can't really remember.  I had to mix some colours because I don't have a real brown.  I'll have to put it on my shopping list!

American Apparel Nail Polish? Say whaaat?

I was researching the ‘jelly sandwich’ and came across a blog that used American Apparel glitter nail polish.    I really liked the looks of the big glitter so I thought I would stroll up there on my lunch break. I would have had no idea that they sold nail polish.  Not a fan of the clothes but that’s a rant for another day…….like why are these clothes so expensive anyways?  Who pays $30.00 for a unisex big pocket tank.  I can find the same style and quality at a thrift store….don’t even get me started on Urban Outfitters.....Apologies :oP
So back to my story. I picked these up and thought I would do a swatch to see what they were like.  Here in Canada they were 3 for $18.00. Probably the most expensive in all the 20 something countries they sell in.  The colours  from right to left are :

Meteor shower, Galaxy and Light Year

Each of the swatches I did are two coats.  So to sum it up I do like these polishes but only because I would use them for a certain purpose….the Jelly Sandwich manicure. Hope to get to that this weekend. Wish me luck!!!
To see more of a review and some great pictures check out  http://nailartistacky.blogspot.ca/. It’s a great blog with a lot of fun manicures


Thursday, 19 July 2012

Lemon & Lime Fizz Nails

Once again I was playing around with my dotting tool. :oP  I had bought the below polishs from Avon. We all know that person that guilts you in to buying avon product.  To be honest I was pretty impressed with it. Both application and coverage were pretty good.  For some reason this design reminded me of Lemon/Lime pop.  You know the no name cans you get from the grocery store?  Maybe its the dots the remind me of the fizzy carbination.  I really don't know but thats all that came to my mind. 


Swatches

AVON Nail Wear Pro in 'Sunshine'


AVON Nail Wear Pro in 'Absinthe'

Wednesday, 18 July 2012

Make Your Own Nail Polish......Attempt 1!!!

I thought I would share my first attempt to create my own nail polish. It was a good learning experience because I've learnt what not to do!

What you'll need
Clear nail polish, eye shadow, glitter, a piece of paper and a tooth pick


I used mac mineral powder to get a bit of a sheen. For the glitter I used some small viles that I got at the dollar store awhile back.  I think these actually were intended for nail art.  For my clear polish I used an old bottle of Borghese.


First I rolled up my piece of paper to make a funnel for the powder and glitter to go through.  Then I started with the Mac mineral powder.  I was impressed at how little I needed to get that pearly sheen.


 Next , in with the glitter!


Everything just sank to the bottom as I suspected it would.  


I shook the bottle for about a minute as well as used the toothpick to stir. This helped mix up the glitter/powder as well as gave my flabby arms a work out ;o)....and VOILA!!


 Alot of the colour came out of the sparkles.  I guess I should not of expected too much as they were from the dollar store.   The pearly shine is beautiful though.  Of course pictures never do nail polish justice

And finally application!!! This is three coats.  I could of added more of the mineral powder but then the sparkles would not of shown up at all.  The longer they are in the bottle the more iridescent the sparkles have become


All in all it was pretty fun! Note to self ...by quality sparkles!!!